In this lesson, I will show you how to install OpenCV 3.3.1 with Visual Studio 2015 on Microsoft Windows 7. But it is almost same for other versions of OpenCV, Microsoft Visual Studio and Microsoft Windows.
If you want, you can refer to my older posts
- Installing & Configuring OpenCV 2.4.5 with Visual Studio 2012
- Installing & Configuring OpenCV 2.1 with Visual Studio 2010
There are 2 ways to install OpenCV into your computer. One way is to build the OpenCV from the latest source in the GitHub and use it. But for a beginner, the most suitable way is to use OpenCV pre-built libraries. Therefore I am going to discuss with you how to install and configure OpenCV pre-built libraries with your the most popular C++ IDE, Visual Studio.
Finding the System Type of your Windows 7 Computer
Right click on My Computer icon on your Desktop and click Properties in the context menu. Then you will see a window like this.
 |
Here the system type is 64 bit operating system. So the system architecture is x64. If your system type is 32-bit operating system, please refer my old post Installing & Configuring OpenCV 2.4.5 with Visual Studio 2012.
What you should download
First of all, you should have to download Microsoft Visual Studio 2015, if it is not installed in your computer. I download Visual Studio Community 2015 which is a free, fully-featured Visual Studio edition for students, open-source and individual developers for their commercial and non-commercial development activities. (You will need to register by giving your email address to obtain the free product key).
Then you have to download the OpenCV pre-built, self-extracting executable on Microsoft Windows from SourceForge. You can choose whatever version, you want. But I choose OpenCV 3.3.1 which was the latest stable release when I wrote this tutorial.
Installation
First you have to Install Visual Studio 2015 if it is not installed in your computer. Because this step is straightforward, I'm not going to explain it here.
Then double click the downloaded opencv-3.3.1-vc14.exe file which was downloaded from SourceForge and OpenCV pre-built libraries will be extracted to whatever location, you give. I gave C:\ as the Extract To location in the popped up dialog box.
The default compiler type of the Microsoft Visual Studio 2015 is VC14. And the opencv-3.3.1-vc14.exe file also contains OpenCV libraries, built with VC14 compiler. Therefore if you are using the OpenCV 3.3.1 downloaded from SourceForge and Visual Studio 2015, you are good to go.
You can find supporting compiler types of the installed OpenCV pre-built libraries, if you go to C:\opencv\build\x64. In this particular OpenCV pre-built version, the only supporting compiler type is VC14.
If you want to use a newer version of Microsoft Visual Studio, you should change the compiler type of your Visual Studio project to VC14. Please refer this page on MSDN.
The next step is to set up environment variables correctly in your computer.
Hooray!! You have completed the installation of OpenCV. Next thing you have to do is to configure Visual Studio to use OpenCV pre-built libraries in your computer vision application.
Congratulations!! You have done with all of the configurations of your visual studio IDE. Now you are ready to write your first HelloWorld OpenCV application.
Copy and paste above simple code snippet into the text area of your visual studio project and run it. Please note that you have to replace "D:/My OpenCV Website/Eagle.jpg" in the code with a valid location to an image in your computer. Then you should see a output like the below image.
(If this is not working, try restarting the Visual Studio IDE)
Next Lesson : OpenCV C++ API
Set up Environment Variables
- Open start menu and search for 'edit environment variables' in the search bar in the bottom of the start menu.
- Then click the 'Edit the system environment variables' link in the top of the search results as highlighted in the above image to open the 'System Properties' dialog box.
- In the 'System Properties' dialog box, click the 'Environment Variables...' button window as highlighted in the below image to open the 'Environment Variables' dialog box.
- Click 'New' button at the bottom of the Environment Variables window to create a new environment variable.
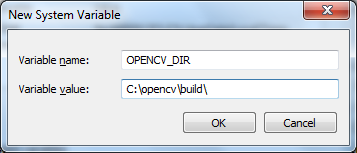
- Type OPENCV_DIR against Variable name field and type the location C:\opencv\build\ against the Variable value field in the popped up dialog box. Please note that I have installed OpenCV pre-built libraries into C: location. If you have used another location as the OpenCV installation location, the Variable value field should be updated accordingly. (e.g. OPENCV_DIR=<OpenCV installation location>\opencv\build\).
Hooray!! You have completed the installation of OpenCV. Next thing you have to do is to configure Visual Studio to use OpenCV pre-built libraries in your computer vision application.
Configure Visual Studio Project
- Start Microsoft Visual Studio
- Go to menu item 'File' > 'New' > 'Project...' to open the 'New Project' window
- Do everything as highlighted in the below image and click OK.
- Click 'Next' button in the popped up 'Win32 Application Wizard' dialog box.
- Then click 'Finish' button in the next window as shown below.
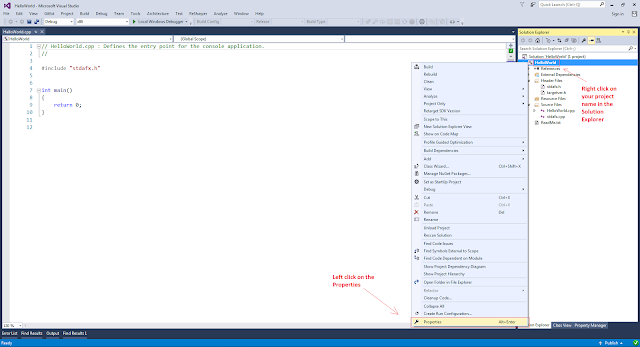
- Then right click on the project name (you have entered this name in a previous step) on the solution explorer and then click 'Properties' in the opened context menu to open the Property Pages window.
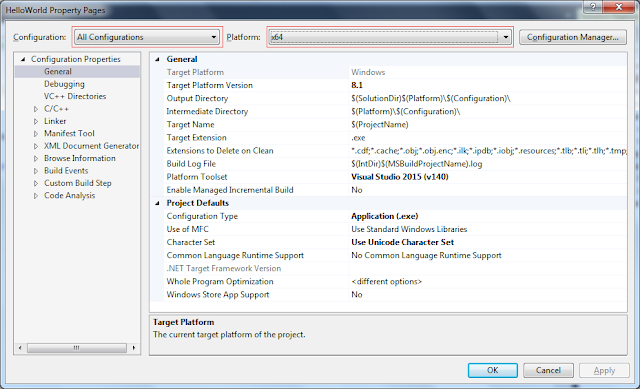
- In Property Pages window, choose 'All Configurations' as the configuration and 'x64' as the Platform as shown in the below image.
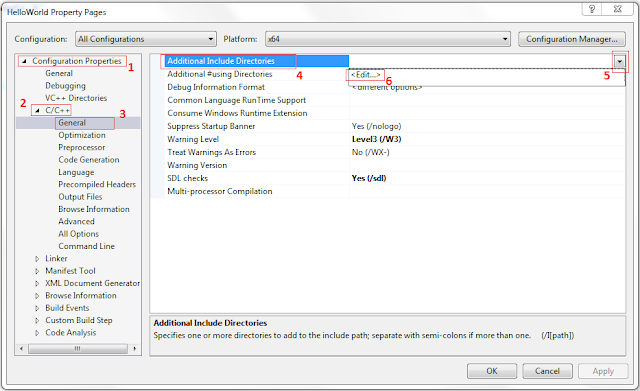
- Click the 6 places in the given order in the Property Pages window as shown in the below image. Then copy and paste $(OPENCV_DIR)\include in the opened dialog box and click OK.
- Click the 6 places in the given order in the Property Pages window as shown in the below image. Then copy and paste $(OPENCV_DIR)\x64\vc14\lib in the opened dialog box and click OK.
- Click the 5 places in the given order in the Property Pages window as shown in the below image. Then copy and paste PATH=$(OPENCV_DIR)\x64\vc14\bin;%PATH% in the opened dialog box and click OK.
- Click the Configuration Manager in the top right corner of the Property Pages window to open the Configuration Manager dialog box.
- In the Configuration Manager dialog box, set the solution platform to x64 in both locations as highlighted in the below image. Then click Close button to close the Configuration Manager dialog box.
- Change the Configuration of the Property Pages window to 'Debug' as shown in the below image.
- Click the 6 places in the given order in the Property Pages window as shown in the below image. Then copy and paste the opencv_world331d.lib in the opened dialog box and click OK. Please verify that this filename can be found in the %OPENCV_DIR%\x64\vc14\lib location.
- Change the Configuration of the Property Pages window to 'Release' as shown in the below image.
- Click the 6 places in the given order in the Property Pages window as shown in the below image. Then copy and paste the opencv_world331.lib in the opened dialog box and click OK. Please verify that this filename can be found in the %OPENCV_DIR%\x64\vc14\lib location.
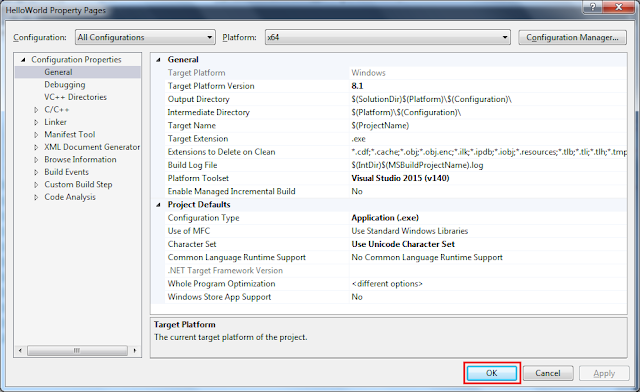
- Click OK button in the bottom right corner of the Property Pages window to save all configurations you have done in previous steps.
Congratulations!! You have done with all of the configurations of your visual studio IDE. Now you are ready to write your first HelloWorld OpenCV application.
Your First OpenCV HelloWorld Application
#include "stdafx.h"

#include <opencv2/opencv.hpp>

#include <iostream>
#include <string>

using namespace cv;
using namespace std;

int main(int argc, char** argv)
{
 // Read the image file
  Mat image = imread("D:/My OpenCV Website/Eagle.jpg");

  if (image.empty()) // Check for failure
  {
   cout << "Could not open or find the image" << endl;
   system("pause"); //wait for any key press
   return -1;
  }

  String windowName = "My HelloWorld Window"; //Name of the window

  namedWindow(windowName); // Create a window

  imshow(windowName, image); // Show our image inside the created window.

  waitKey(0); // Wait for any keystroke in the window

  destroyWindow(windowName); //destroy the created window

  return 0;
}
Copy and paste above simple code snippet into the text area of your visual studio project and run it. Please note that you have to replace "D:/My OpenCV Website/Eagle.jpg" in the code with a valid location to an image in your computer. Then you should see a output like the below image.
(If this is not working, try restarting the Visual Studio IDE)
Next Lesson : OpenCV C++ API


